 This page documents the installation of 12.1.2.0.3 Grid Infrastructure for a Standalone system. In this case I needed it in order to install and test ASM Filter Driver (ASMFD) as part of a post I wrote called Oracle’s ASM Filter Driver Revisited. It was originally included within the post but I soon realised it would make the article unreadable due to the amount of screen output I’ve included to document the installation process. Besides, it fits in better with the installation cookbooks section anyway…
Preparing To Install
I’m using an Oracle Linux 6 Update 5 system running the Oracle Unbreakable Enterprise Kernel v3:
[root@server4 ~]# cat /etc/oracle-release
Oracle Linux Server release 6.5
[root@server4 ~]# uname -r
3.8.13-26.2.3.el6uek.x86_64
As usual I have taken all of the necessary pre-installation steps to make the Oracle Universal Installer happy. I have disabled selinux and iptables, plus I’ve configured device mapper multipathing.
Installing Oracle 12.1.0.2. Grid Infrastructure (software only)
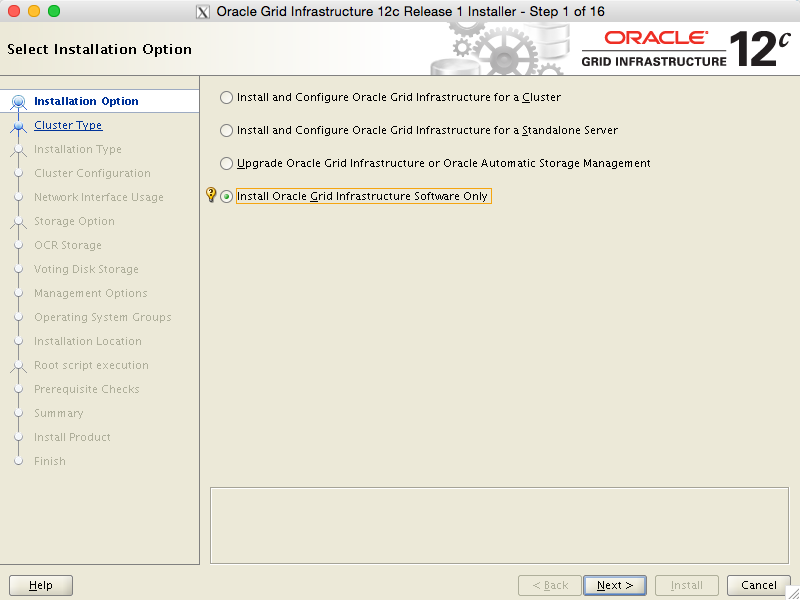
For this example I am performing a “Software Only” installation. Why? Well because I want to use ASMFD to manage my storage devices, but that’s only available after an Oracle Home has been installed. Yet the usual OUI installation methods require storage devices to already be present in order to store things like ASM SPFILEs, OCR and voting disks. It’s a chicken and egg thing.
Anyway, for this example I will extract the 12.1.0.2 grid infrastructure installation files and then run the installer. At the first page I will choose “Software Only” then follow all the remaining instructions.
At the end of the installation I am required to run the root.sh script as the root user and this script finishes with some important tips on what to do next:
[root@server4 ~]# sh /u01/app/12.1.0/grid/root.sh
Performing root user operation.

The following environment variables are set as:
    ORACLE_OWNER= oracle
    ORACLE_HOME=  /u01/app/12.1.0/grid

Enter the full pathname of the local bin directory: [/usr/local/bin]:
The contents of "dbhome" have not changed. No need to overwrite.
The contents of "oraenv" have not changed. No need to overwrite.
The contents of "coraenv" have not changed. No need to overwrite.

Creating /etc/oratab file...
Entries will be added to the /etc/oratab file as needed by
Database Configuration Assistant when a database is created
Finished running generic part of root script.
Now product-specific root actions will be performed.

To configure Grid Infrastructure for a Stand-Alone Server run the following command as the root user:
/u01/app/12.1.0/grid/perl/bin/perl -I/u01/app/12.1.0/grid/perl/lib -I/u01/app/12.1.0/grid/crs/install /u01/app/12.1.0/grid/crs/install/roothas.pl

To configure Grid Infrastructure for a Cluster execute the following command as oracle user:
/u01/app/12.1.0/grid/crs/config/config.sh
This command launches the Grid Infrastructure Configuration Wizard. The wizard also supports silent operation, and the parameters can be passed through the response file that is available in the installation media.
For this demonstration I am only using a stand-alone system rather than a cluster, so I’ll be using the first of the two commands (in blue, the other being in purple):
[root@server4 ~]# /u01/app/12.1.0/grid/perl/bin/perl -I/u01/app/12.1.0/grid/perl/lib -I/u01/app/12.1.0/grid/crs/install /u01/app/12.1.0/grid/crs/install/roothas.pl
Using configuration parameter file: /u01/app/12.1.0/grid/crs/install/crsconfig_params
LOCAL ADD MODE
Creating OCR keys for user 'oracle', privgrp 'oinstall'..
Operation successful.
LOCAL ONLY MODE
Successfully accumulated necessary OCR keys.
Creating OCR keys for user 'root', privgrp 'root'..
Operation successful.
CRS-4664: Node server4 successfully pinned.
2015/07/22 15:33:36 CLSRSC-330: Adding Clusterware entries to file 'oracle-ohasd.conf'

server4     2015/07/22 15:34:03     /u01/app/12.1.0/grid/cdata/server4/backup_20150722_153403.olr     0
CRS-2791: Starting shutdown of Oracle High Availability Services-managed resources on 'server4'
CRS-2673: Attempting to stop 'ora.evmd' on 'server4'
CRS-2677: Stop of 'ora.evmd' on 'server4' succeeded
CRS-2793: Shutdown of Oracle High Availability Services-managed resources on 'server4' has completed
CRS-4133: Oracle High Availability Services has been stopped.
CRS-4123: Oracle High Availability Services has been started.
2015/07/22 15:35:26 CLSRSC-327: Successfully configured Oracle Restart for a standalone server
Now that this is complete I can turn my attention to installing the 12.1.0.2.3 patch set update.
Installing The 12.1.2.0.3 PSU
I have to confess that the process of installing PSUs and CPUs has always irked me. There are too many things that have to be done just right. For example, one must have an up-to-date version of OPatch installing – but not too up-to-date or it might not work. Forget to use a new enough version of OPatch and you will see some uninformative error such as “opatchauto failed with error code 2.” – gee thanks.
Sometimes you can run an opatch auto and sometimes you can’t, but other times you run opatchauto (all one word). Where is the consistency? As for the tedious pre-installation patch conflict and resolution steps… I just can’t be bothered (it’s vanilla install, after all). But there is nothing that gets my goat more than this:
[root@server4 20485724]# opatchauto apply /home/oracle/Install/12102/20485724 -oh /u01/app/12.1.0/grid
OPatch Automation Tool
Copyright (c)2014, Oracle Corporation. All rights reserved.

OPatchauto Version : 12.1.0.1.6
OUI Version        : 12.1.0.2.0
Running from       : /u01/app/12.1.0/grid

opatchauto log file: /u01/app/12.1.0/grid/cfgtoollogs/opatchauto/20485724/opatch_gi_2015-07-22_16-01-19_deploy.log

NOTE: OCM Response file has two default locations:
1. /OPatch/ocm.rsp
2. /OPatch/ocm/bin/ocm.rsp
These locations can be overridden by using '-ocmrf' command-line option

ERROR: OCM Response file could not be found.
Parameter Validation: FAILED

Opatchauto Session failed: Parameter validation failed
opatchauto failed with error code 1.
This tedious failure is caused by the lack of an Oracle Configuration Manager (OCM) response file, although for inconsistency’s sake sometimes the message says, “Enter the absolute OCM response file path“. I absolutely HATE this. I despise it. Why must we go through this every time? Get ready to be patronised:
[oracle@server4 ~]$ $ORACLE_HOME/OPatch/ocm/bin/emocmrsp
OCM Installation Response Generator 10.3.7.0.0 - Production
Copyright (c) 2005, 2012, Oracle and/or its affiliates.  All rights reserved.

Provide your email address to be informed of security issues, install and
initiate Oracle Configuration Manager. Easier for you if you use your My
Oracle Support Email address/User Name.
Visit http://www.oracle.com/support/policies.html for details.
Email address/User Name: <leave blank>

You have not provided an email address for notification of security issues.
Do you wish to remain uninformed of security issues ([Y]es, [N]o) [N]:  KISS MY ASS!
Email address/User Name:

You have not provided an email address for notification of security issues.
Do you wish to remain uninformed of security issues ([Y]es, [N]o) [N]:  y
The OCM configuration response file (ocm.rsp) was successfully created.
[oracle@server4 ~]$ ls -l ocm.rsp
-rw-r--r-- 1 oracle oinstall 623 Jul 22 16:09 ocm.rsp
Gaah!
Now that we have the ocm.rsp file I can run opatch again with the -ocmrf option:
[root@server4 20485724]# opatchauto apply /home/oracle/Install/12102/20485724 -oh /u01/app/12.1.0/grid -ocmrf ~oracle/ocm.rsp
OPatch Automation Tool
Copyright (c)2014, Oracle Corporation. All rights reserved.

OPatchauto Version : 12.1.0.1.6
OUI Version        : 12.1.0.2.0
Running from       : /u01/app/12.1.0/grid

opatchauto log file: /u01/app/12.1.0/grid/cfgtoollogs/opatchauto/20485724/opatch_gi_2015-07-22_16-12-39_deploy.log

Parameter Validation: Successful

Configuration Validation: Successful

Patch Location: /home/oracle/Install/12102/20485724
Grid Infrastructure Patch(es): 19872484 20299018 20299022 20299023
DB Patch(es): 20299022 20299023

Patch Validation: Successful
User specified following Grid Infrastructure home:
/u01/app/12.1.0/grid

Performing prepatch operations on SIHA Home... Successful

Applying patch(es) to "/u01/app/12.1.0/grid" ...
Patch "/home/oracle/Install/12102/20485724/19872484" successfully applied to "/u01/app/12.1.0/grid".
Patch "/home/oracle/Install/12102/20485724/20299018" successfully applied to "/u01/app/12.1.0/grid".
Patch "/home/oracle/Install/12102/20485724/20299022" successfully applied to "/u01/app/12.1.0/grid".
Patch "/home/oracle/Install/12102/20485724/20299023" successfully applied to "/u01/app/12.1.0/grid".

Performing postpatch operations on SIHA Home... Successful

Apply Summary:
Following patch(es) are successfully installed:
GI Home: /u01/app/12.1.0/grid: 19872484,20299018,20299022,20299023

opatchauto succeeded.
That’s the PSU installed – and there is one more step to follow from the post-installation instructions:
[oracle@server4 ~]$ . oraenv
ORACLE_SID = [] ? +ASM
ORACLE_HOME = [/home/oracle] ? /u01/app/12.1.0/grid
The Oracle base remains unchanged with value /u01/app/oracle
[oracle@server4 ~]$ cd $ORACLE_HOME/oui/bin
[oracle@server4 bin]$ ./runInstaller -updateNodeList ORACLE_HOME=$ORACLE_HOME -defaultHomeName CLUSTER_NODES= CRS=TRUE
Starting Oracle Universal Installer...

Checking swap space: must be greater than 500 MB.   Actual 22167 MB    Passed
The inventory pointer is located at /etc/oraInst.loc
'UpdateNodeList' was successful.
Now it’s time to turn our attention to ASM.
Creating and Configuring ASM
At this stage, we have Oracle High Availability Services (HAS) installed but not really running. In particular, the CSSD process isn’t running – and that makes it pretty difficult to do anything. Look:
[oracle@server4 ~]$ sqlplus / as sysasm
SQL*Plus: Release 12.1.0.2.0 Production on Wed Jul 22 16:34:13 2015
Copyright (c) 1982, 2014, Oracle.  All rights reserved.

Connected to an idle instance.
SQL> startup
ORA-01078: failure in processing system parameters
ORA-29701: unable to connect to Cluster Synchronization Service
SQL> exit
Disconnected

[oracle@server4 ~]$ crsctl stat res -t
--------------------------------------------------------------------------------
Name           Target  State        Server                   State details
--------------------------------------------------------------------------------
Local Resources
--------------------------------------------------------------------------------
ora.ons
               OFFLINE OFFLINE      server4                  STABLE
--------------------------------------------------------------------------------
Cluster Resources
--------------------------------------------------------------------------------
ora.cssd
      1        OFFLINE OFFLINE                               STABLE
ora.diskmon
      1        OFFLINE OFFLINE                               STABLE
ora.evmd
      1        ONLINE  ONLINE       server4                  STABLE
--------------------------------------------------------------------------------
So we need to start CSSD before anything else can happen. In the old days I might have run the crsctl start resource command, but that doesn’t seem to work anymore:
[oracle@server4 ~]$ crsctl start resource ora.cssd
CRS-4995:  The command 'Start  resource' is invalid in crsctl. Use srvctl for this command.
However, the -init flag (which isn’t documented here) allows command to be run:
[oracle@server4 ~]$ crsctl start resource ora.cssd -init
CRS-2672: Attempting to start 'ora.cssd' on 'server4'
CRS-2672: Attempting to start 'ora.diskmon' on 'server4'
CRS-2676: Start of 'ora.diskmon' on 'server4' succeeded
CRS-2676: Start of 'ora.cssd' on 'server4' succeeded
[oracle@server4 ~]$ crsctl stat res -t
--------------------------------------------------------------------------------
Name           Target  State        Server                   State details
--------------------------------------------------------------------------------
Local Resources
--------------------------------------------------------------------------------
ora.ons
               OFFLINE OFFLINE      server4                  STABLE
--------------------------------------------------------------------------------
Cluster Resources
--------------------------------------------------------------------------------
ora.cssd
      1        ONLINE  ONLINE       server4                  STABLE
ora.diskmon
      1        OFFLINE OFFLINE                               STABLE
ora.evmd
      1        ONLINE  ONLINE       server4                  STABLE
--------------------------------------------------------------------------------
Now we can go ahead with creating the various resources required to get a working ASM instance up and running. First let’s fix the oratab file:
[oracle@server4 ~]$ ls -l /etc/oratab
-rw-rw-r-- 1 oracle oinstall 741 Jul 22 15:30 /etc/oratab
[oracle@server4 ~]$ echo "+ASM:/u01/app/12.1.0/grid:N" >> /etc/oratab
[oracle@server4 ~]$ . oraenv
ORACLE_SID = [+ASM] ?
The Oracle base remains unchanged with value /u01/app/oracle
And create an ASM init.ora parameter file:
[oracle@server4 ~]$ mkdir -p /u01/app/oracle/admin/+ASM/pfile
[oracle@server4 ~]$ vi /u01/app/oracle/admin/+ASM/pfile/init+ASM.ora
[oracle@server4 ~]$ ln -s /u01/app/oracle/admin/+ASM/pfile/init+ASM.ora $ORACLE_HOME/dbs/init+ASM.ora
The init.ora parameter file had the contents:
*.asm_power_limit=5
*.large_pool_size=12M
*.remote_login_passwordfile='EXCLUSIVE'
Plus a password file:
[oracle@server4 ~]$ cd $ORACLE_HOME/dbs
[oracle@server4 dbs]$ orapwd file=orapw+ASM password=oracle
[oracle@server4 dbs]$ ls -l orapw+ASM
-rw-r----- 1 oracle oinstall 7680 Jul 22 16:57 orapw+ASM
Before we create ASM we need a listener:
[oracle@server4 ~]$ srvctl add listener -l LISTENER
[oracle@server4 ~]$ srvctl start listener -l LISTENER
And now the ASM resource itself:
[oracle@server4 ~]$ srvctl add asm
[oracle@server4 ~]$ srvctl config asm
ASM home:
Password file:
ASM listener: LISTENER
Spfile:
ASM diskgroup discovery string: ++no-value-at-resource-creation--never-updated-through-ASM++
[oracle@server4 ~]$ srvctl modify asm -pwfile $ORACLE_HOME/dbs/orapw+ASM
Finally, we can create an SPFILE from the init.ora file created earlier and add that to the ASM resource’s configuration:
[oracle@server4 ~]$ sqlplus / as sysasm
SQL*Plus: Release 12.1.0.2.0 Production on Wed Jul 22 17:04:15 2015
Copyright (c) 1982, 2014, Oracle.  All rights reserved.

Connected to an idle instance.
SQL> create spfile='/u01/app/oracle/admin/+ASM/pfile/spfile+ASM.ora' from pfile;

File created.

SQL> exit
Disconnected
[oracle@server4 ~]$ srvctl modify asm -spfile /u01/app/oracle/admin/+ASM/pfile/spfile+ASM.ora
[oracle@server4 ~]$ srvctl config asm
ASM home:
Password file: /u01/app/12.1.0/grid/dbs/orapw+ASM
ASM listener: LISTENER
Spfile: /u01/app/oracle/admin/+ASM/pfile/spfile+ASM.ora
ASM diskgroup discovery string: ++no-value-at-resource-creation--never-updated-through-ASM++
Now the ASM instance can be started up:
[oracle@server4 ~]$ sqlplus / as sysasm
SQL*Plus: Release 12.1.0.2.0 Production on Wed Jul 22 17:06:28 2015
Copyright (c) 1982, 2014, Oracle.  All rights reserved.

Connected to an idle instance.
SQL> startup
ASM instance started

Total System Global Area 1140850688 bytes
Fixed Size		    2933400 bytes
Variable Size		 1112751464 bytes
ASM Cache		   25165824 bytes
ORA-15110: no diskgroups mounted
The final step is to create the ASMSNMP user, grant it SYSDBA privileges and then restart ASM:
SQL> create user asmsnmp identified by oracle;

User created.

SQL> grant sysdba to asmsnmp;

Grant succeeded.

SQL> exit
Disconnected from Oracle Database 12c Enterprise Edition Release 12.1.0.2.0 - 64bit Production
With the Automatic Storage Management option
[oracle@server4 ~]$ srvctl stop asm
[oracle@server4 ~]$ srvctl start asm
[oracle@server4 ~]$ crsctl stat res -t
--------------------------------------------------------------------------------
Name           Target  State        Server                   State details
--------------------------------------------------------------------------------
Local Resources
--------------------------------------------------------------------------------
ora.LISTENER.lsnr
               ONLINE  ONLINE       server4                  STABLE
ora.asm
               ONLINE  ONLINE       server4                  Started,STABLE
ora.ons
               OFFLINE OFFLINE      server4                  STABLE
--------------------------------------------------------------------------------
Cluster Resources
--------------------------------------------------------------------------------
ora.cssd
      1        ONLINE  ONLINE       server4                  STABLE
ora.diskmon
      1        OFFLINE OFFLINE                               STABLE
ora.evmd
      1        ONLINE  ONLINE       server4                  STABLE
--------------------------------------------------------------------------------
We now have a working installation of 12.1.2.0.3 Grid Infrastructure along with an available ASM instance. Back to the original post if you want to see what happened next…

Thanks for the detailed solution for the issue and it is helpful for me.
Many thanks for the detailed procedure. Using your article I could do the same for 19c.