 This cookbook is part of the Advanced Cookbooks series, for installing Oracle on Violin using a 4k-based ASM diskgroup. If you are unsure what that means, do not proceed any further until you have read this. Configuring ASM to use 4k sectors is interesting, but not necessary – you can achieve excellent performance by following one of the Simple Cookbooks with the added benefit that your installations will take a lot less time… In this cookbook I will be installing Oracle 11.2.0.3 single-instance on SUSE Linux SP3 which has a 3.0.76-0.11 kernel version. There isn’t much deviation from the installations I am more used to on Oracle Linux and Red Hat Linux, with the exception that the 3.x kernel brings with it some changes to the multipath settings and UDEV rules. SUSE has already been installed on the server and I’ve followed the basic Oracle Installation Guide instructions to setup things like the Oracle user and create the relevant directories (e.g. /u01):
server2:~ # cat /etc/SuSE-release
SUSE Linux Enterprise Server 11 (x86_64)
VERSION = 11
PATCHLEVEL = 3
server2:~ # uname -r
3.0.76-0.11-default
I’ve also, for the sake of convenience, disabled the SUSE firewall altogether:
server2:/etc # /sbin/SuSEfirewall2 off
SuSEfirewall2: batch committing...
SuSEfirewall2: Firewall rules unloaded.
I’m not going to include a complete cut and paste of all the usual Oracle pre-installation tasks, so let’s skip straight to the crucial stuff. First up is ASMLib.
Installing and Configuring Oracle ASMLib
I’ve used the truly-horrendous yast application on the SUSE media to install the relevant packages that I require, which includes the oracleasm kernel library:
server2:~ # rpm -qa | grep oracle
oracleasm-2.0.5-7.37.3
oracleasm-kmp-default-2.0.5_3.0.76_0.11-7.37.3
Next I need to download the other two parts of ASMLib, the library package and the support module:
server2:~ # wget http://oss.oracle.com/projects/oracleasm-support/dist/files/RPMS/sles11/amd64/2.1.8/oracleasm-support-2.1.8-1.SLE11.x86_64.rpm

<snip!>

100%[===========================================================>] 123,671      238K/s   in 0.5s

2014-03-24 14:29:43 (238 KB/s) - `oracleasm-support-2.1.8-1.SLE11.x86_64.rpm' saved [123671/123671]

server2:~ # wget http://download.oracle.com/otn_software/asmlib/oracleasmlib-2.0.4-1.sle11.x86_64.rpm

<snip!>

100%[===========================================================>] 31,149      --.-K/s   in 0.1s

2014-03-24 14:30:43 (214 KB/s) - `oracleasmlib-2.0.4-1.sle11.x86_64.rpm' saved [31149/31149]
After this I can install the RPMs and then run the configure command to set ASMLib up:
server2:~ # rpm -i oracleasmlib-2.0.4-1.sle11.x86_64.rpm
server2:~ # rpm -i oracleasm-support-2.1.8-1.SLE11.x86_64.rpm
server2:~ # modprobe oracleasm
server2:~ # lsmod | grep oracleasm
oracleasm              58884  0
server2:~ # /etc/init.d/oracleasm configure
Configuring the Oracle ASM library driver.

This will configure the on-boot properties of the Oracle ASM library
driver.  The following questions will determine whether the driver is
loaded on boot and what permissions it will have.  The current values
will be shown in brackets ('[]').  Hitting  without typing an
answer will keep that current value.  Ctrl-C will abort.

Default user to own the driver interface []: oracle
Default group to own the driver interface []: dba
Start Oracle ASM library driver on boot (y/n) [n]: y
Scan for Oracle ASM disks on boot (y/n) [y]: y
Writing Oracle ASM library driver configuration:                        done
Initializing the Oracle ASMLib driver:                                  done
Scanning the system for Oracle ASMLib disks:                            done
Notice the configuration file placed in the /etc/sysconfig directory. It has some configuration settings that need to be amended:
server2:~ # ls -l /etc/sysconfig/oracleasm*
lrwxrwxrwx 1 root root  24 Mar 24 14:38 /etc/sysconfig/oracleasm -> oracleasm-_dev_oracleasm
-rw-r--r-- 1 root root 973 Mar 24 14:38 /etc/sysconfig/oracleasm-_dev_oracleasm
server2:~ # tail -11 /etc/sysconfig/oracleasm
# ORACLEASM_SCANORDER: Matching patterns to order disk scanning
ORACLEASM_SCANORDER=""

# ORACLEASM_SCANEXCLUDE: Matching patterns to exclude disks from scan
ORACLEASM_SCANEXCLUDE=""

# ORACLEASM_USE_LOGICAL_BLOCK_SIZE: 'true' means use the logical block size
# reported by the underlying disk instead of the physical. The default
# is 'false'
ORACLEASM_USE_LOGICAL_BLOCK_SIZE=false
I’m going to set the ORACLEASM_SCANORDER value to “dm” because I want Oracle to use the multipath devices. I’m also going to exclude the SCSI (i.e. single path) devices by setting ORACLEASM_SCANEXCLUDE to “sd“. Finally, I need to set ORACLEASM_USE_LOGICAL_BLOCK_SIZE to be true (lower case is required) because I want to be able to present LUNs from Violin which are using 512 byte emulation. If this value were to be left at the default of false then ASMLib would always use the physcial block size from Violin, which is always 4k. ASMLib needs to be restarted to pick up the changed configuration:
server2:~ # /etc/init.d/oracleasm restart
Dropping Oracle ASMLib disks:                                           done
Shutting down the Oracle ASMLib driver:                                 done
Initializing the Oracle ASMLib driver:                                  done
Scanning the system for Oracle ASMLib disks:                            done
ASMLib is now ready, so let’s turn our attention to the UDEV rules.
Configuring UDEV
Linux uses UDEV as its device mapper. The UDEV system uses a set of (some would say complicated) rules to configure and present devices as files within the /dev filesystem. The rules are located in the /dev/udev/rules.d directory and are processed according to filename: each filename has the format nn-name.rules where nn is a two-digit number. This means files which start with lower numbers are processed first. It’s also possible for one of the files to contain a rule which tells UDEV not to process any further rules for the device in question – making it really easy to lose track of what is going on with your device management. In our case, we want to override some of the default choices UDEV makes, such as which I/O scheduler is in use, whether the device is rotational (clue: no!) and so on. Anyway, enough chat. Let’s setup the rules for Violin:
server2:~ # cd /etc/udev/rules.d
server2:/etc/udev/rules.d # vi 12-violin.rules
My rules file will look like this:
KERNEL=="sd*[!0-9]|sg*", BUS=="scsi", SYSFS{vendor}=="VIOLIN", RUN+="/bin/sh -c 'echo noop > /sys/$devpath/queue/scheduler'"
KERNEL=="sd*[!0-9]|sg*", BUS=="scsi", SYSFS{vendor}=="VIOLIN", RUN+="/bin/sh -c 'echo 0 > /sys/$devpath/queue/rotational'"
KERNEL=="sd*[!0-9]|sg*", BUS=="scsi", SYSFS{vendor}=="VIOLIN", RUN+="/bin/sh -c 'echo 1024 > /sys/$devpath/queue/nr_requests'"
KERNEL=="sd*[!0-9]|sg*", BUS=="scsi", SYSFS{vendor}=="VIOLIN", RUN+="/bin/sh -c 'echo 2 > /sys/$devpath/queue/rq_affinity'"
KERNEL=="sd*[!0-9]|sg*", BUS=="scsi", SYSFS{vendor}=="VIOLIN", RUN+="/bin/sh -c 'echo 1 > /sys/$devpath/queue/nomerges'"
KERNEL=="sd*[!0-9]|sg*", BUS=="scsi", SYSFS{vendor}=="VIOLIN", RUN+="/bin/sh -c 'echo 4096 > /sys/$devpath/queue/max_sectors_kb'"
KERNEL=="sd*[!0-9]|sg*", BUS=="scsi", SYSFS{vendor}=="VIOLIN", RUN+="/bin/sh -c 'echo 0 > /sys/$devpath/queue/add_random'"
ENV{DM_UUID}=="mpath-36001b97?*", RUN+="/bin/sh -c 'echo noop > /sys/$devpath/queue/scheduler'"
ENV{DM_UUID}=="mpath-36001b97?*", RUN+="/bin/sh -c 'echo 0 > /sys/$devpath/queue/rotational'"
ENV{DM_UUID}=="mpath-36001b97?*", RUN+="/bin/sh -c 'echo 64 > /sys/$devpath/queue/nr_requests'"
ENV{DM_UUID}=="mpath-36001b97?*", RUN+="/bin/sh -c 'echo 2 > /sys/$devpath/queue/rq_affinity'"
ENV{DM_UUID}=="mpath-36001b97?*", RUN+="/bin/sh -c 'echo 1 > /sys/$devpath/queue/nomerges'"
ENV{DM_UUID}=="mpath-36001b97?*", RUN+="/bin/sh -c 'echo 4096 >  /sys/$devpath/queue/max_sectors_kb'"
ENV{DM_UUID}=="mpath-36001b97?*", RUN+="/bin/sh -c 'echo 0 >  /sys/$devpath/queue/add_random'"
Note that there are two sets of rules – the first are for the SCSI devices (i.e. the /dev/sd* devices corresponding to each single path) and the second are for the /dev/dm-* devices created by the multipathing daemon. The new rules can be picked up with the following two commands:
server2:~ # udevadm control --reload-rules
server2:~ # udevadm trigger
Configuring Multipathing
In SLES 11 SP3 there have been some changes to the various options avialable in the /etc/multipath.conf file. This includes the deprecation of the getuid_callout parameter and the change of path_selector from it’s previous default value of “round robin 0” to a new default of “service-time 0”. However, the testing we have performed at Violin shows that the round robin consistently allows better results under benchmarking, so at least for now I will be sticking with that. There are plenty of other changes from previous multipath configurations, which you can read about here. Here’s my /etc/multipath.conf:
defaults {
}
blacklist {
	devnode "^(ram|raw|loop|fd|md|dm-|sr|scd|st)[0-9]*"
	devnode "^hd[a-z]"
	devnode "^dcssblk[0-9]*"
}
blacklist_exceptions {
	property "(ID_SCSI_VPD|ID_WWN)"
}
devices {
        device {
                vendor                  "VIOLIN"
                product                 "SAN ARRAY"
                path_grouping_policy    group_by_serial
                path_selector           "round-robin 0"
                path_checker            tur
                hardware_handler        "0"
                failback                immediate
                rr_weight               uniform
                no_path_retry           fail
	}
        device {
        	vendor                  "VIOLIN"
        	product                 "SAN ARRAY ALUA"
                path_selector           "round-robin 0"
        	prio                    "alua"
        	path_grouping_policy    group_by_prio
        	path_checker            tur
        	hardware_handler        "0"
        	failback                immediate
        	no_path_retry           fail
		detect_prio		yes
        }
multipaths {
}
There are two entries for Violin here, one for LUNs presented using ALUA and one for the those that aren’t (since the product ID changes). The settings are slightly different as ALUA LUNs should be grouped by priority rather than serial number. The new settings are picked up using the following commands:
server2:/dev/mapper # multipath -F
server2:/dev/mapper # multipath -v1
Now it’s time to create the LUNs I need and present them to the database server.
Presenting Violin Storage
In this cookbook I’m going to build a database using 4k based LUNs (see this page if you don’t know what that means). This guarantees that all I/Os will be aligned to the underlying flash and that the minimum I/O size will always be 4k, which in turn guarantees the very best performance available. I will need one single LUN with a 512 byte sector size in which to create the Oracle SPFILE (it would also be home to other Oracle files such as the OCR and Voting Disks if I were building a cluster). 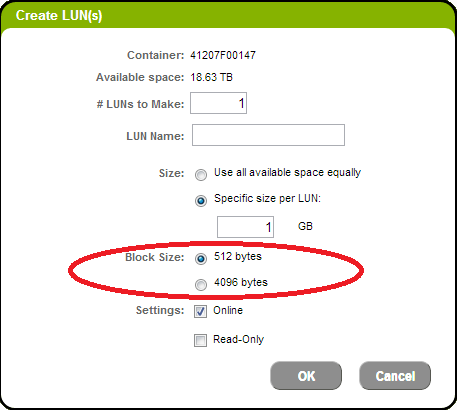 In the above picture, which is a snapshot of the LUN creation screen on a Violin array, the LUN sector size is defined by the “Block Size” radio buttons. I’ve created 8 x 250GB LUNs for my +DATA diskgroup, 2 x 1TB LUNs for +RECO (the Fast Recovery Area) and 1 X 10GB LUN for +SYSTEMDG. All except the SYSTEMDG are using 4k sectors. I’ve used the rescan-scsi-bus.sh script (found in most flavours of Linux these days) to rescan the SCSI bus and then run the multipath -F and multipath -v1 commands to pick up the new devices, which get presented as multipath aliases in the /dev/mapper directory using names that aren’t nice and friendly. Luckily I can use my setup_violin_mpath.sh script to give them all friendly names. I’ve run it and added the output to the /etc/multipath.conf file, so now I see lots of nicely-named devices in /dev/mapper:
server2:/dev/mapper # ls -l
total 0
lrwxrwxrwx 1 root root       7 Mar 24 16:27 DATA1 -> ../dm-0
lrwxrwxrwx 1 root root       7 Mar 24 16:27 DATA2 -> ../dm-5
lrwxrwxrwx 1 root root       7 Mar 24 16:27 DATA3 -> ../dm-6
lrwxrwxrwx 1 root root       7 Mar 24 16:27 DATA4 -> ../dm-7
lrwxrwxrwx 1 root root       7 Mar 24 16:27 DATA5 -> ../dm-8
lrwxrwxrwx 1 root root       7 Mar 24 16:27 DATA6 -> ../dm-9
lrwxrwxrwx 1 root root       8 Mar 24 16:27 DATA7 -> ../dm-10
lrwxrwxrwx 1 root root       8 Mar 24 16:27 DATA8 -> ../dm-11
lrwxrwxrwx 1 root root       7 Mar 24 16:27 RECO1 -> ../dm-2
lrwxrwxrwx 1 root root       7 Mar 24 16:27 RECO2 -> ../dm-3
lrwxrwxrwx 1 root root       7 Mar 24 16:27 SYSTEMDG -> ../dm-4
These devices are now ready to be labelled by Oracle ASMLib.
Labelling ASMLib Devices
To keep things simple I’m going to give each device the same ASMLib name as it’s device name. I’m also going to overwrite each device with 32MB of zeros first, so it’s nice and clean:
erver2:/dev/mapper # for lun in `ls -1 DATA* RECO* SYSTEMDG`; do dd if=/dev/zero of=$lun bs=32k count=1024; oracleasm createdisk $lun $lun; done
1024+0 records in
1024+0 records out
33554432 bytes (34 MB) copied, 0.0576828 s, 582 MB/s
Writing disk header: done
Instantiating disk: done
1024+0 records in
1024+0 records out
33554432 bytes (34 MB) copied, 0.0546716 s, 614 MB/s
Writing disk header: done
Instantiating disk: done
1024+0 records in
1024+0 records out
33554432 bytes (34 MB) copied, 0.0614032 s, 546 MB/s
Writing disk header: done
Instantiating disk: done
<...etc...>
erver2:/dev/mapper # oracleasm listdisks
DATA1
DATA2
DATA3
DATA4
DATA5
DATA6
DATA7
DATA8
RECO1
RECO2
SYSTEMDG
Ok so the devices are all present and correct, so let’s install Oracle.
Installing Oracle Grid Infrastructure
I don’t think there’s any need to document this in detail, other than to point out a couple of key points. I’m installing Oracle Grid Infrastructure 11.2.0.3 and I’m choosing to configure for a Standalone Installation (mainly because I only have one test server available). When it comes to setting up the ASM diskgroups I’m going to configure my single 10GB LUN as a diskgroup called +SYSTEMDG (using external reduncancy): 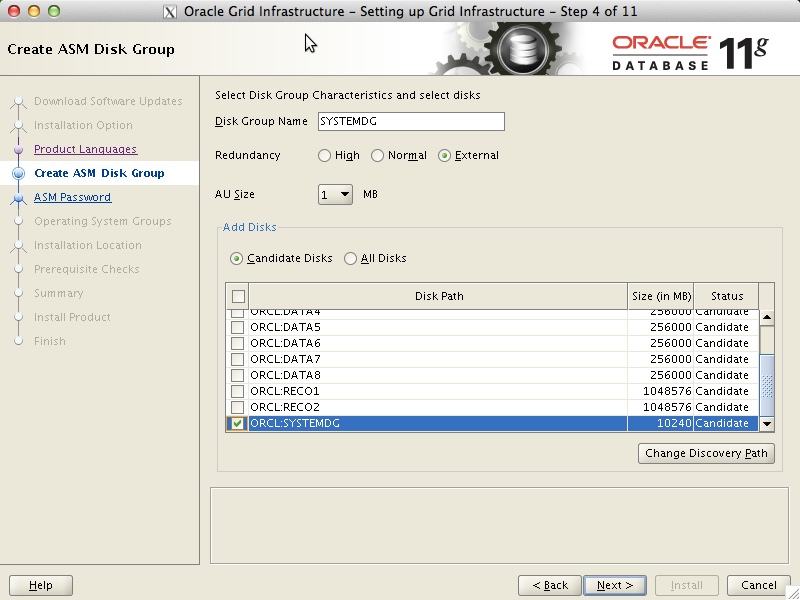 Because this is SUSE and I didn’t have Oracle’s handy preinstall RPM available I have to allow OUI to create and run a fixup script to change all the various kernel parameters that I missed during my skimming of the Oracle installation guide. Naturally OUI also complains that my swap space isn’t large enough (when is it ever large enough for OUI? That’s a rhetorical question, don’t answer it…) but I tell it I don’t care. The installation completes with no issues and it’s almost time to install the database, but first we need two more ASM disk groups:
oracle@server2:~> . oraenv
ORACLE_SID = [oracle] ? +ASM
The Oracle base has been set to /u01/app/oracle
oracle@server2:~> sqlplus / as sysasm
SQL*Plus: Release 11.2.0.3.0 Production on Mon Mar 24 17:48:57 2014
Copyright (c) 1982, 2011, Oracle.  All rights reserved.

Connected to:
Oracle Database 11g Enterprise Edition Release 11.2.0.3.0 - 64bit Production
With the Automatic Storage Management option

SQL> CREATE DISKGROUP DATA EXTERNAL REDUNDANCY
DISK 'ORCL:DATA1', 'ORCL:DATA2',
     'ORCL:DATA3', 'ORCL:DATA4',
     'ORCL:DATA5', 'ORCL:DATA6',
     'ORCL:DATA7', 'ORCL:DATA8'
ATTRIBUTE
     'compatible.asm' = '11.2',
     'compatible.rdbms' = '11.2';

Diskgroup created.

SQL> CREATE DISKGROUP RECO EXTERNAL REDUNDANCY
DISK 'ORCL:RECO1', 'ORCL:RECO2'
ATTRIBUTE
     'compatible.asm' = '11.2',
     'compatible.rdbms' = '11.2';

Diskgroup created.
We can check that the diskgroups have the correct sector sizes with the v$asm_diskgroup view, or with my new favourite utility, ASMCMD:
oracle@server2:~> asmcmd
ASMCMD> lsdg
State    Type    Rebal  Sector  Block       AU  Total_MB  Free_MB  Req_mir_free_MB  Usable_file_MB  Offline_disks  Voting_files  Name
MOUNTED  EXTERN  N        4096   4096  1048576   2048000  2047918                0         2047918              0             N  DATA/
MOUNTED  EXTERN  N        4096   4096  1048576   2097152  2097080                0         2097080              0             N  RECO/
MOUNTED  EXTERN  N         512   4096  1048576     10240    10181                0           10181              0             N  SYSTEMDG/
So +DATA and +RECO have 4096 sector sizes while +SYSTEMDG has 512… perfect.
Installing and Creating Oracle Database
There is very little of note for the installation, since I am just choosing the basic single “Install database software only” option from OUI. During the database creation with DBCA however, I need to choose the option to create the database as a set of scripts, because that way I can amend the location of the SPFILE to put it in the +SYSTEMDG diskgroup: 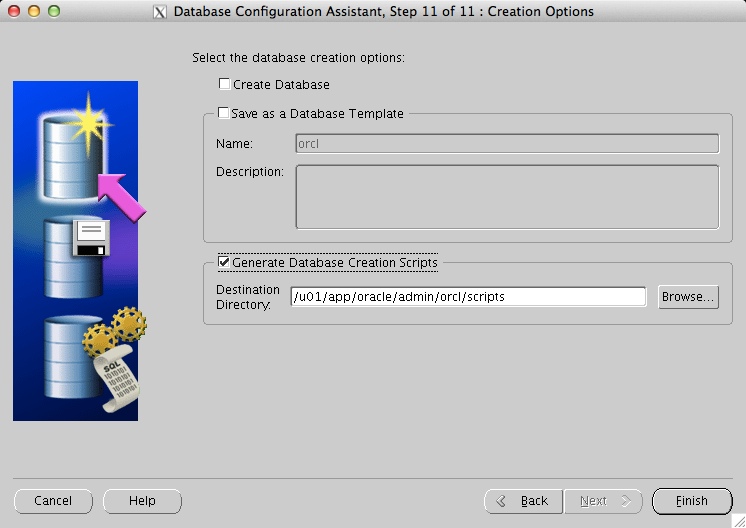 One the scripts have been created, I can browse them in the /u01/app/oracle/admin/<ORACLE-SID>/scripts directory:
oracle@server2:~> cd /u01/app/oracle/admin/orcl/scripts/
oracle@server2:/u01/app/oracle/admin/orcl/scripts> ls -l
total 9580
-rw-r----- 1 oracle oinstall    1893 Mar 24 18:10 cloneDBCreation.sql
-rw-r----- 1 oracle oinstall     823 Mar 24 18:10 CloneRmanRestore.sql
-rw-r----- 1 oracle oinstall    2019 Mar 24 18:10 init.ora
-rw-r----- 1 oracle oinstall    2112 Mar 24 18:10 initorclTempOMF.ora
-rw-r----- 1 oracle oinstall    2055 Mar 24 18:10 initorclTemp.ora
-rw-r----- 1 oracle oinstall     507 Mar 24 18:10 lockAccount.sql
-rwxr-xr-x 1 oracle oinstall     511 Mar 24 18:10 orcl.sh
-rwxr-xr-x 1 oracle oinstall     940 Mar 24 18:10 orcl.sql
-rw-r----- 1 oracle oinstall     854 Mar 24 18:10 postDBCreation.sql
-rw-r----- 1 oracle oinstall    1008 Mar 24 18:10 postScripts.sql
-rw-r----- 1 oracle oinstall    1457 Mar 24 18:10 rmanRestoreDatafiles.sql
-rw-r----- 1 oracle oinstall 9748480 Mar 24 18:10 tempControl.ctl
oracle@server2:/u01/app/oracle/admin/orcl/scripts> grep -il spfile *
orcl.sql
postDBCreation.sql
We can see here that there are two files that need amending to change the SPFILE location, so let’s edit them. Here’s the orcl.sql file before I amended it:
set verify off
ACCEPT sysPassword CHAR PROMPT 'Enter new password for SYS: ' HIDE
ACCEPT systemPassword CHAR PROMPT 'Enter new password for SYSTEM: ' HIDE
host /u01/app/oracle/product/11.2.0/dbhome_1/bin/orapwd file=/u01/app/oracle/product/11.2.0/dbhome_1/dbs/orapworcl force=y
host /u01/app/oracle/product/11.2.0/grid/bin/setasmgidwrap o=/u01/app/oracle/product/11.2.0/dbhome_1/bin/oracle
@/u01/app/oracle/admin/orcl/scripts/CloneRmanRestore.sql
@/u01/app/oracle/admin/orcl/scripts/cloneDBCreation.sql
@/u01/app/oracle/admin/orcl/scripts/postScripts.sql
host /u01/app/oracle/product/11.2.0/dbhome_1/bin/srvctl add database -d orcl -o /u01/app/oracle/product/11.2.0/dbhome_1 -p +DATA/orcl/spfileorcl.ora -n orcl -a "DATA,RECO"
host echo "SPFILE='+DATA/orcl/spfileorcl.ora'" > /u01/app/oracle/product/11.2.0/dbhome_1/dbs/initorcl.ora
@/u01/app/oracle/admin/orcl/scripts/lockAccount.sql
@/u01/app/oracle/admin/orcl/scripts/postDBCreation.sql
To change it I need to move the SPFILE to +SYSTEMDG and then also add +SYSTEMDG to the list of diskgroups required by that service in Clusterware. Here are the two modified lines:
host /u01/app/oracle/product/11.2.0/dbhome_1/bin/srvctl add database -d orcl -o /u01/app/oracle/product/11.2.0/dbhome_1 -p +SYSTEMDG/orcl/spfileorcl.ora -n orcl -a "DATA,RECO,SYSTEMDG"
host echo "SPFILE='+SYSTEMDG/orcl/spfileorcl.ora'" > /u01/app/oracle/product/11.2.0/dbhome_1/dbs/initorcl.ora
The other file was postDBCreation.sql, which looks like this:
SET VERIFY OFF
connect "SYS"/"&&sysPassword" as SYSDBA
set echo on
spool /u01/app/oracle/admin/orcl/scripts/postDBCreation.log append
@/u01/app/oracle/product/11.2.0/dbhome_1/rdbms/admin/catbundle.sql psu apply;
select 'utl_recomp_begin: ' || to_char(sysdate, 'HH:MI:SS') from dual;
execute utl_recomp.recomp_serial();
select 'utl_recomp_end: ' || to_char(sysdate, 'HH:MI:SS') from dual;
execute dbms_swrf_internal.cleanup_database(cleanup_local => FALSE);
commit;
connect "SYS"/"&&sysPassword" as SYSDBA
set echo on
create spfile='+DATA/orcl/spfileorcl.ora' FROM pfile='/u01/app/oracle/admin/orcl/scripts/init.ora';
shutdown immediate;
host /u01/app/oracle/product/11.2.0/dbhome_1/bin/srvctl enable database -d orcl;
host /u01/app/oracle/product/11.2.0/dbhome_1/bin/srvctl start database -d orcl;
connect "SYS"/"&&sysPassword" as SYSDBA
spool off
exit;
Again I need to amend the diskgroup, but there is only one line to change in this case:
create spfile='+SYSTEMDG/orcl/spfileorcl.ora' FROM pfile='/u01/app/oracle/admin/orcl/scripts/init.ora';
All that remains now is for me to run the orcl.sh script which will create the database and corresponding Clusterware services. I really don’t have enough space to cut and paste all of the output from that, so let’s finish up with a shot from Clusterware showing that everything is up and running:
racle@server2:~> . oraenv
ORACLE_SID = [orcl] ? +ASM
The Oracle base remains unchanged with value /u01/app/oracle
oracle@server2:~> crsctl stat res -t
--------------------------------------------------------------------------------
NAME           TARGET  STATE        SERVER                   STATE_DETAILS
--------------------------------------------------------------------------------
Local Resources
--------------------------------------------------------------------------------
ora.DATA.dg
               ONLINE  ONLINE       server2
ora.LISTENER.lsnr
               ONLINE  ONLINE       server2
ora.RECO.dg
               ONLINE  ONLINE       server2
ora.SYSTEMDG.dg
               ONLINE  ONLINE       server2
ora.asm
               ONLINE  ONLINE       server2                  Started
ora.ons
               OFFLINE OFFLINE      server2
--------------------------------------------------------------------------------
Cluster Resources
--------------------------------------------------------------------------------
ora.cssd
      1        ONLINE  ONLINE       server2
ora.diskmon
      1        OFFLINE OFFLINE
ora.evmd
      1        ONLINE  ONLINE       server2
ora.orcl.db
      1        ONLINE  ONLINE       server2                  Open
Plus, just for good measure, a quick look at the redo logs to make sure they are sized with a 4k block size:
QL> select * from v$log;

    GROUP#    THREAD#  SEQUENCE#      BYTES  BLOCKSIZE	  MEMBERS ARC STATUS	       FIRST_CHANGE# FIRST_TIM NEXT_CHANGE# NEXT_TIME
---------- ---------- ---------- ---------- ---------- ---------- --- ---------------- ------------- --------- ------------ ---------
	 1	    1	       1   52428800	  4096		2 NO  INACTIVE		      995548 24-MAR-14	    1000690 24-MAR-14
	 2	    1	       2   52428800	  4096		2 NO  INACTIVE		     1000690 24-MAR-14	    1008924 24-MAR-14
	 3	    1	       3   52428800	  4096		2 NO  CURRENT		     1008924 24-MAR-14	 2.8147E+14
Great. To be honest those logs aren’t big enough (and there aren’t enough of them) for my purposes going forward, but other than that everything is good to go. Time to close the cookbook and start thinking about subjecting this database to some Oracle SLOB tests…
